Recent Stories
-
10 ModCloth Accessories For The Creator's Soul
-

Heart Rate Workouts That Make Time On The Treadmill Fly By
-

Sundance Style III: A Streetcar Named Desire
-

Me Oh My! You Are Sweeter Than Pie: DIY Mailable Mini Chess Pies
-

Moonshine Cherries & Bacon Frosting: 10 Valentine’s Gifts For Dudes
-

Go Mini For The Big Game, Menu #1: Super Sliders
Filtered by: Living / How To Create A Bouquet That Will Never Die
Nov
4,
2011
4,
2011
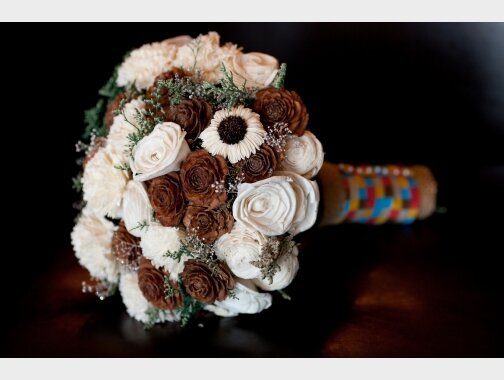


One of my favorite parts about planning my wedding was challenging myself to not hire a florist and to instead, make faux-quets out of materials that would never die so that I could re-use them after the big event. By doing so, I also saved a ton of money - who knew flowers were so expensive? Apparently, not me.
The bouquet I made was created completely out of wood - cedar, sola and balsa wood - and guests at my wedding literally had to touch it to believe that it wasn’t real. It now sits on top of a table in my dining room, where I use it as both a decorative touch and a sentimental memory. You can use any flowers you want, but I’ve listed links to the type I purchased below.
Materials
- 20 Natural Cedar Roses On Stems ($0.89 each)
- 10 Sola Shell Flowers ($0.22 each)
- 15 Sola Roses ($5)
- Wire stem ($8)
- 2 Bundles of Preserved Caspia ($16)
- Floral tape ($2)
- Glue gun
- Wire cutters
Instructions
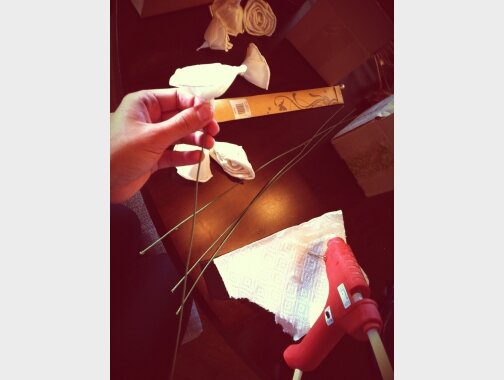
1) For flowers without stems (the sola flowers), use wire stem and first, poke a hole in the bottom base of your flower. This will make for easier gluing. Then, dab some hot glue into the hole and attach your stem. Hold for 20-30s to set. Repeat for each flower until all flowers have stems.
Materials
- 20 Natural Cedar Roses On Stems ($0.89 each)
- 10 Sola Shell Flowers ($0.22 each)
- 15 Sola Roses ($5)
- Wire stem ($8)
- 2 Bundles of Preserved Caspia ($16)
- Floral tape ($2)
- Glue gun
- Wire cutters
Instructions
1) For flowers without stems (the sola flowers), use wire stem and first, poke a hole in the bottom base of your flower. This will make for easier gluing. Then, dab some hot glue into the hole and attach your stem. Hold for 20-30s to set. Repeat for each flower until all flowers have stems.
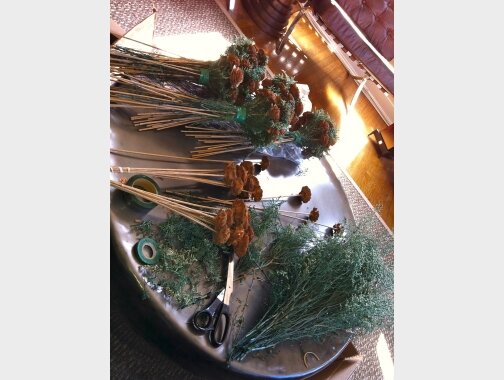
2) Using one hand to hold and one hand to assemble, slowly start building a bundle, taking equal amounts of caspia and flowers and working around in an outwardly circular pattern to fill out. Once you have used about 10 flowers, wrap your bundle with floral tape where your hand had been on the stem. You will create 3-4 different bundles just like this (this is dependent on the size of your bundles and the size you want your bouquet to be).
3) Once all bundles have been created, hold them all together until you are satisfied with the 360-degree look. Then, just like before, wrap all bundles together securely with floral tape along the stems.
4) Using a wire cutter, trim your stems to whatever length you’d like. Mine was 6-8” from the base to where the flowers began.
5) Optional: cover with fabric of your choice and secure with corsage pins. Or, simply stick your bouquet into the vase of your choice.
All in, I think the process took me a little over an hour and cost me about $50. That’s the same cost as a professional bouquet and 4x less than most bridal bouquets, plus I get to keep it forever and it doubles as a conversation piece whenever I have guests over. I also ended up making cedar rose bouquets for all of my bridesmaids so that they could also have a keepsake from the event. Who knows - maybe one day I’ll even get to show it to my own daughter.
If you decide to create your own bouquet, please send photos of your creation and I’ll post the best here for all to see: .
You might also like
-

IXXI is the Easiest Way To Customize Walls With Your Own Designs
-

Creating Your Own Stitched Stationary
-
Friendship Cords

I help people discover innovative products and ideas to live more simply, beautifully, and creatively. Read more.
GET IDEAS IN YOUR INBOX