Recent Stories
-
10 ModCloth Accessories For The Creator's Soul
-

Heart Rate Workouts That Make Time On The Treadmill Fly By
-
Sundance Style III: A Streetcar Named Desire
-

Me Oh My! You Are Sweeter Than Pie: DIY Mailable Mini Chess Pies
-

Moonshine Cherries & Bacon Frosting: 10 Valentine’s Gifts For Dudes
-

Go Mini For The Big Game, Menu #1: Super Sliders
Filtered by: Living / How To Make Pine Cone Magnets
9,
2011
How To Make Pine Cone Magnets
Posted In: Living | Posted By: Anj

In spite of e-greetings left and right, the holidays still mean a plethora of cards, invitations, photos, and announcements. But, the idea of dedicating a mantel, dining table or bureau solely to holiday cards is tough to do and, if you live in a city, probably impossible.
In today’s project, we set about creating a way to display cards and photos on the fridge in a festive way that combines found objects in nature and magnets. As it is, magnets tend to fall into two categories: novelty and not really magnetic or boringly functional but super magnetic. So, why not make your own? Pine cones and their cousins are a great combo of charming, rustic, winter-y and surprisingly flexible for crafting. Add in a little hot glue and easy-to-find magnet dots, and you’re done!
Materials:
- pine cones (which will turn into roses!)
- hemlock cones
- magnet dots
- hot glue gun

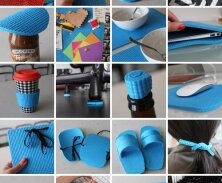
To turn the pine cones into roses, just use a hand saw or very sharp knife to saw off the top (the pointed end) leaving only 1-2" of the bottom left, turn over, and you’ve got your rose.

Now that you’ve got all of your cones ready to turn into magnets, heat up the hot glue gun and separate the magnets flat on your work table. Put glue on the bottom of each cone and push onto the magnets so the cones are standing upright.
Let dry for a few minutes and huzzah! You’ve got a great set of magnets for your holiday cards, and for the rest of the year. The small hemlock ones are great for your desk or nightstand as well!

How do you display your holiday cards and photos? Send your creative display ideas our way:
You might also like
-
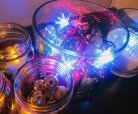
Let There Be Light! LED Holiday Centerpieces
-
Creating Your Own Stitched Stationary
-
12 Days Of Wrapping: Neon Duct Tape

I help people discover innovative products and ideas to live more simply, beautifully, and creatively. Read more.
GET IDEAS IN YOUR INBOX